The Destiny Weekly Nightfall Strike for the week of August 4, 2015 is The Devi’s Lair, the first Strike that Guardians complete when they first start playing Destiny. In its Nightfall version, it’s quite a bit more difficult, but the concepts to completing it remain virtually untouched. Each area has a specific formula or place where you can stand that allows you to “cheese” your way through, even if you aren’t given the added bonus of an elemental burn.
Nightfall: The Devil’s Lair
This week’s Nightfall comes with several modifiers that are designed to make things difficult. If you don’t know what you’re doing, they will certainly accomplish their goals. If you follow our guide, they will do nothing but add a few minutes onto the end of a fairly simple strike.
- Epic – Heavily shielded and highly aggressive enemies appear in great numbers.
- Nightfall – If all players die, your Fireteam is returned to Orbit.
- Lightswitch – Minions of the Darkness deal much more melee damage.
- Brawler – Guardian melee damage is greatly increased.
- Angry – Minions of the Darkness won’t flinch, even after massive damage.
If you have one, it’s Ice Breaker time, as that weapon regenerates ammo on its own. This means that you get a hard punch, and you never have to run out into the open and risk dying. As well, all of our ideas for where to engage your enemies are at a distance that favors a Sniper Rifle. If you don’t have an Ice Breaker, go with a Sniper Rifle that does high damage (preferably 365), and perhaps compliment it with a Scout Rifle as your Primary Weapon.
When you spawn in on earth, summon your Sparrow and ride forward and into the building with your objective-marker. If you don’t see the objective-marker, you can summon your Ghost and it will display on the screen for you. Make your way through the hallways and corridors until you see a small group of Fallen doing battle with some Hive. Kill everyone and keep pushing forward.
The next major area is one that again sees the Fallen and Hive in battle. You need to clear the room before you can think about anything else, so start eliminating enemies and building up your supply of ammunition (unless you have the Ice Breaker). When the room is clear, deploy your Ghost on the device next to the gate and get ready for three tough waves of enemies.
Rather than fight in the open, or up on that balcony, you want to move to the very far side of the room where several crashed train cars can be found. Go to the one in the very back (next to the tunnel) and sit on top of it. From here you can safely engage the enemy with your Ice Breaker (or whatever you have), and they won’t even bother to shoot back. This, ladies and gentlemen, is what we call a cheese spot.
There will likely be a few enemies that you must move up to take out, but you should be spending the bulk of your time back here and clearing out the majority of foes. Pay special attention to Captains, Wizards and Vandals, or anything with a shield that will make your life more difficult. After all three waves are down, snag your ammo and head through the now open gate.
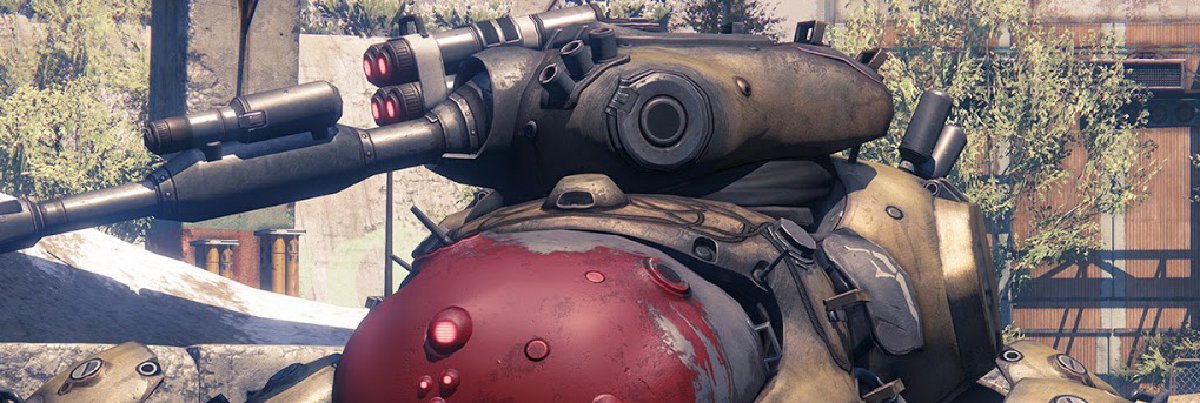
Make your way through the next several rooms until you find a small group of Fallen. Take them out, and then head outside to where the Devil Walker spawns in. Don’t go forward like everybody likes to do – there are two cheese spots that you can utilize so you never have to take a shot from any of your adversaries.
The first cheese spot is directly to your left when you exit the building and step foot into the yard where the Devil Walker spawns. There is a building there, and if you jump on top you can take cover behind one of the air conditioning units. If you have a Sniper Rifle (hopefully the Ice Breaker), you can pop shots off at the Devil Walker and never be bothered by any of its minions, or the giant mechanical spider itself. Just sit there and kill it.
The other cheese spot is actually on a ledge on the wall to the right when you exit the building. You can sit up there and basically do the same thing we described on the left. Some prefer the left, some prefer the right, but both spots are basically fool proof. Just make sure you eliminate the adds (lower level bad guys) when your foe is down, and then grab up all the ammo before moving on.
Make your way through the building until you reach a closed door. It will open and there will be some Fallen just beyond it. You have to go outside to kill them, but you will be coming back to this room and fighting Sepiks Prime from where you stood just before the door opened up. The only adds you ever have to worry about coming in after you are the Captain and his thugs that spawn inside the room to your left every little bit, but that can be dealt with as a Fireteam.
When Sepiks Prime finally appears, put shots into its eye from your Ice Breaker. We suggest letting your weapon fill up with six rounds, then hitting him with all of them. After that, switch to your Primary Weapon and continue to do damage. This helps to ensure the pressure is always on, rather than have you take a break while waiting for ammo to replenish. As always, if you don’t have an Ice Breaker, just use whatever it is you do have. Should your run out of ammo, make a quick run outside when there are only a few adds and grab more.
If your entire Fireteam is using this strategy, the Nightfall should be a piece of cake. If you have someone who is constantly going where they shouldn’t and dying, let them stay dead for a bit – they need to learn the ways of Destiny.
When Sepiks Prime falls the mission will end and you’ll be in for some sweet rewards (we hope). Be sure to let us know what you got. Was it that elusive Etheric Light, or did you get yourself an exotic that you’ve been hunting for several months now?


