Beginning your journey isn’t tough, but it’s still helpful to have our Far: Lone Sails walkthrough of Setting Out. Right from the start you’ll be introduced to the most basic commands in the game. There isn’t much to the opening of Far: Lone Sails, but it will give you a good idea of some of the micromanagement that you’ll need to worry about throughout the game. This first portion of our Far: Lone Sails walkthrough will take you through the first bit of the game, so get ready and let’s dive in.
Board Your Ship
Once the game starts, head to the right and make your way into the house. Here you’ll learn how to activate buttons. Buttons are a major part of progression in Far: Lone Sails, so be sure to pay attention to the world and look for buttons to move things forward.
Controls in Far are very easy to pick up. You can use W, A and D to move around and jump, or press the Right, Left and Up arrow keys on your keyboard. You can also press V to pick up and hold items, and V again to drop them.
Head through the house and activate the button to open the way upstairs. Make your way upstairs, grab the lantern from the bedroom, and then you’ll learn how to zoom in on your character by pressing X.
Drop down through the right hole in the floor and over the wardrobe. Continue out of the house and off the porch. From here, keep moving right down the path until you reach your ship.
Ship Functions
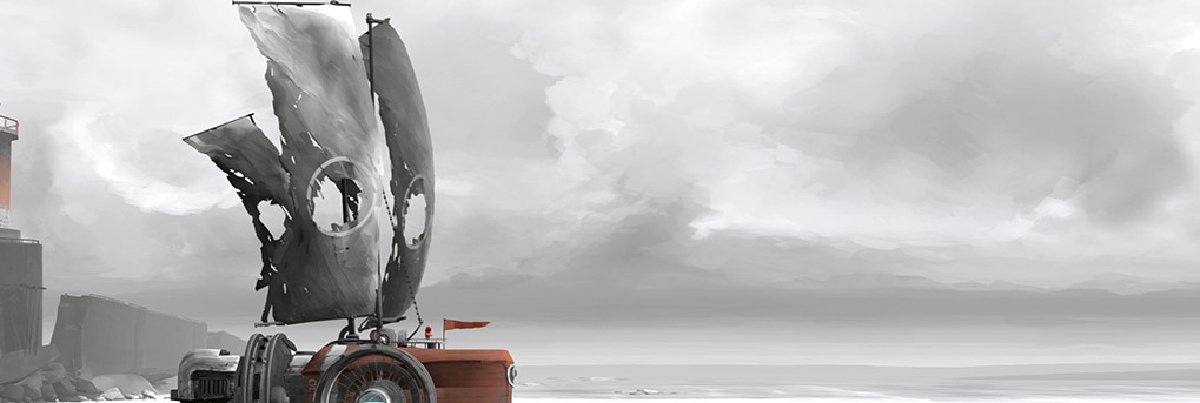
Your ship is your primary mode of transportation in Far: Lone Sails, and while it might not look like much now, you’ll find a few upgrades for it along the way. Hop aboard the ship and you should spot several different sections you need to know about.
First, there is the Energy Gauge. This tells you how much fuel your ship has. There are three buttons in this area to know about. There’s the Steam button, which is located just above a button. This is where excess steam from the engine will build up. You’ll need to press the button here to expel it. If you let the Steam reach a higher level—say around halfway—you can press the button and get a nice little speed boost from things.
Next is the Speed indicator. This tells you how fast you’re going. It’s really only useful if you’re trying to grab the ‘hit max speed’ achievement but keep an eye on it anyways. There’s also a button beside it. This is the Engine button. You’ll need to depress it and keep an eye on it to keep the steam engine running. It won’t stay down the entire time, so you’ll have to manage it, as well as the Steam levels.
Finally, the third button is this area is the Brake. This instantly brings the ship to a stop, which can be useful if you come across items that you’ll use for fuel, or if you are going to collide with an immovable object—like a gate or some other item.
Next, you’ll want to take a look at the back of the ship, where a small button and an arrow pointing up can be found. This is how you get more energy for your ship. First, place an item—like a box or a barrel—on the platform and then press the button. This will break down the item and send the fuel into the Energy area. You’ll need to keep items nearby on several hooks, which will allow you to easily refuel when you need it.
The final things to take into account now are the elevator in the center—this is your only way up—and the fire hose in the top left-hand area of the ship. You can also see a few indicators on the right-hand area of the energy bar. This is your ship’s health. Things like the engine and the refueling area can be damaged by storms and other things—like collisions—so make sure you’re paying attention to these health levels. For now, there isn’t much you can do about it. We’ll cover how to repair your ship at a later time.
There are a few other functions that you can unlock for your ship in Far: Lone Sails, but we’ll cover them when they are introduced.
With the basics of the ship learned, it is time to get started on your journey. Head down to the engine area and add some fuel to the engine. Then, head over to the engine button and depress it to set off and leave your home behind. You’ll start off with enough fuel to make it to a batch of boxes on the ground. Once you reach this area, hit the brake, and then hop off and grab the boxes. Refuel as needed, and then stash the other boxes away for later.
With your engine refueled, activate the ship once more and continue on your way. We’d suggest stopping for any boxes that you spot, as having excess fuel items will be key to your continued progression later on.
Getting Your Sails
Your ship’s steam engine isn’t the only way to keep your ship moving in Far, though. After a few minutes of riding along, you’ll arrive at a large crane. This is where you’ll get the sails for your ship. The sails are another item you’ll need to manage—and repair as needed—so be ready to add a bit more complexity to the game.
You won’t have to worry about lining things up exactly right now, as the game will do that for you. Once the ship comes to a rest, hop into the elevator, ride up to the top, and then climb onto the crane. Head inside and you’ll find a button that will lower the sails onto your ship.
With the sails aboard and attached, it’s time to learn how to use them. Like everything else in Far: Lone Sails, the sails are controlled by a button. Unlike the Engine, though, this button will stay depressed as long as you want—allowing that you don’t run into anything and damage them. You’ll find the button for the sails right where the sails attach to the ship. Go ahead and depress it now to activate the sails.
You can tell when there is wind that your sails can make use of by paying attention to the red flag on your ship. When it’s waving forward—to the right—activate the sails to save fuel in your steam engine, while still allowing you to move forward.
Move the Propeller
Continue on your way until your ship comes to a stop because of a large propeller in the way. Once you reach this area, head out of the back of your ship, and drop through the hole with the stairway. From here, continue down and through the path until you reach the other side. Here you’ll find a button that you can press that will remove cause the propeller to fall clear of the path. Head up the stairs to the right, then make your way back into your ship and reactivate the sails to continue forward. Make sure you grab the boxes and other items here before you continue, that way you won’t run out of fuel anytime soon.
The majority of your time in Far: Lone Sails will be spent micromanaging your resources and keeping your ship running in tip-top conditions. Because of this, expect some lulls between puzzles.
Cross the Bridge
The next juncture that you come to will be a massive bridge that has the way blocked by a large metal weight. You’ll need to clear this weight in order to continue across the bridge and get on with your journey.
Head off the ship and make sure your lower your sails so that the ship doesn’t take off without you. There’s a barrel here that you can grab, so go ahead and place it in your ship before you forget it. Grab the box nearby and head across the bridge to a small wooden shack on the other side. There’s a small generator on the bottom here that will raise the bridge. Drop the crate into in, then press the button to activate it.
Grab the other barrel here and head back across the bridge. There’s also a lantern on this side of the bridge as well, so you might want to grab it for the additional light/fuel. With the items in tow, make your way back over to the left side of the bridge.
There’s another button you need to activate here. Step on it and the bridge will lower, leaving the way clear. Drop down to the bridge, board your ship, and then activate the steam engine to continue across it.
Now all that’s left to do is continue on your way. Cross over the bridge and keep pushing forward. Eventually you’ll run into your first storm, which will damage some portions of your ship.
Continue reading on through our Far: Lone Sails walkthrough to learn how to fix your ship, or head back to our Far: Lone Sails guide hub for more information and articles about the game.


